Why Cine-D sucks by joe12south [archived version]

[Editor’s note: this post was mangled and ultimately lost as the author’s website changed over time. It illustrates why “shooting flat” and “shooting log” on most consumer camera gear is a bad choice. The content has not been edited except for the presentation of the images and a minor spelling error. Joe: email me if you’d like this removed. Rescued via the Internet Archive.]

There’s good flat, and there’s bad flat. No matter how many people advocate otherwise, smashing down all of your settings on a camera with a highly compressed 8-bit codec is not the same as using a true logarithmic gamma or shooting RAW. It’s just math.

You simply can’t expect to throw away huge chunks of data (by never even recording them) and expect to recover the image without significant errors. Yet the idea that there is some recipe that will magically turn an 8-bit DSLR into a RED Epic is so appealing that we all want to believe it’s so.

But, Joe, doesn’t the GH4 have a log profile? “Cine-D”? Based on Panasonic’s description, it sure seems like a good choice:

Gives priority to the dynamic range by using a gamma curve designed to create film-like images. Suited for editing.

After a few botched shoots and way more testing than I care to remember, I’ve found is that there are two problems using this profile. One seems to be inherent in the profile itself, and the other in how people are using it.

  1. In an attempt to squeeze out extra dynamic range, color accuracy seems to suffer.
  2. Combining Cine-D with totally flat settings yields highly compressed mush.

Need proof? Let your eyes wander to the right. [editor’s note: the original post had images to the right of the text, but that’s not practical here, so they are in a gallery below instead.]

Here’s what we have:

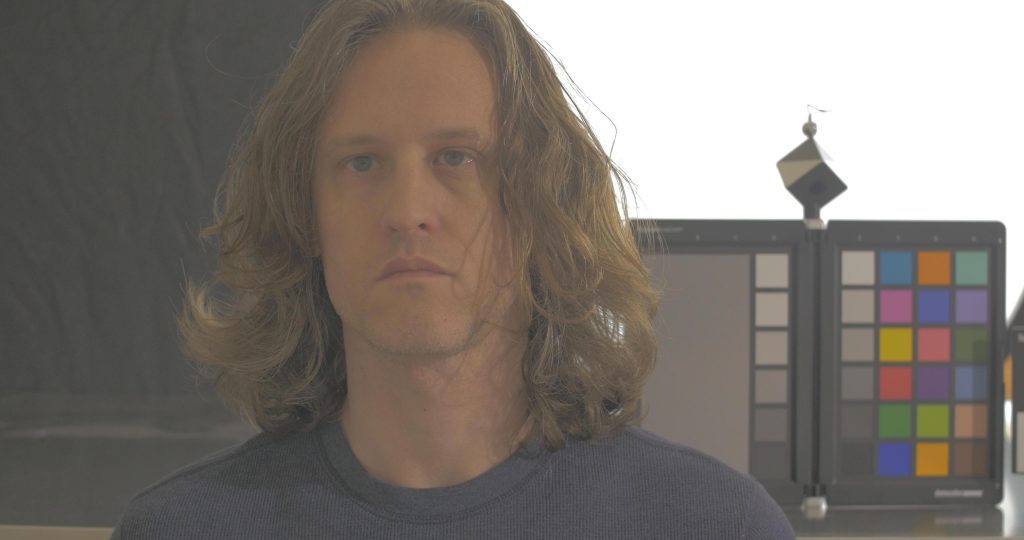
  • The first image is as “flat” as you can make it on the GH4. Cine-D profile. Contrast, saturation, noise reduction all set to -5. Pedestal set at +15.
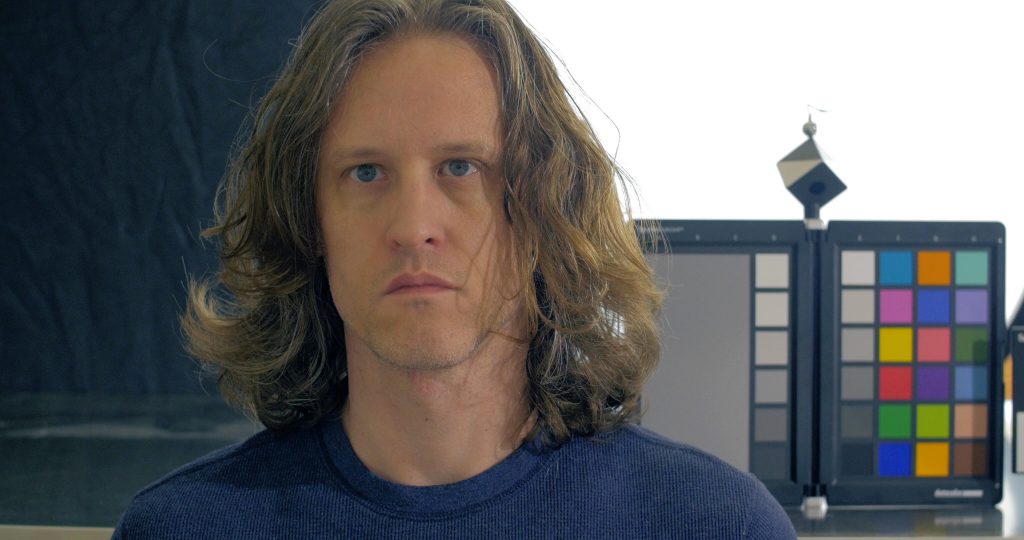
  • The second image is what happens when we “normalize” the Cine-D image. That is to say, we apply a curve to restore the normal response. (Note that middle grey is dead on in both color and luminance.
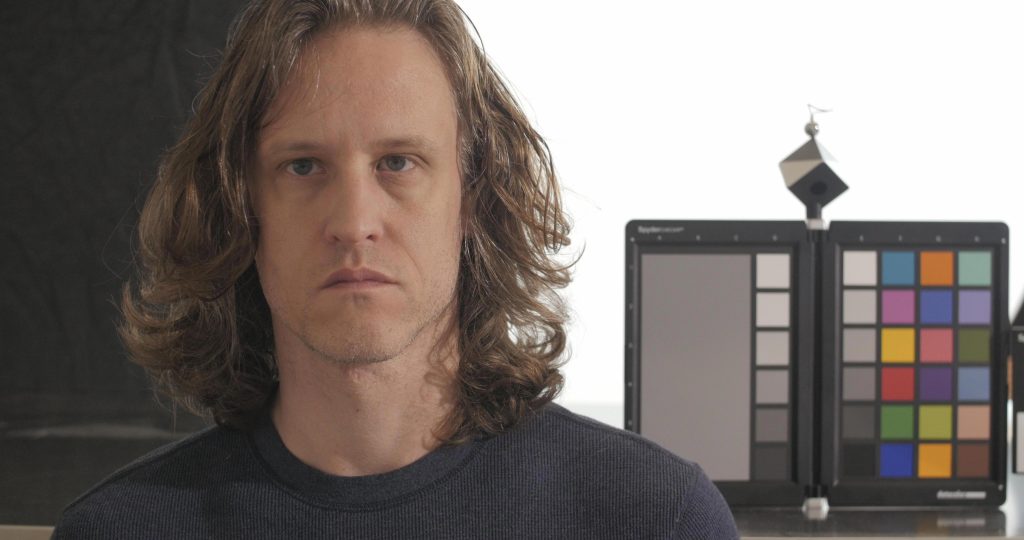
  • The third image is my current “default” shooting profile, Natural with contrast, saturation and noise reduction all set to -5. Shadow at +1, Highlight at -1.
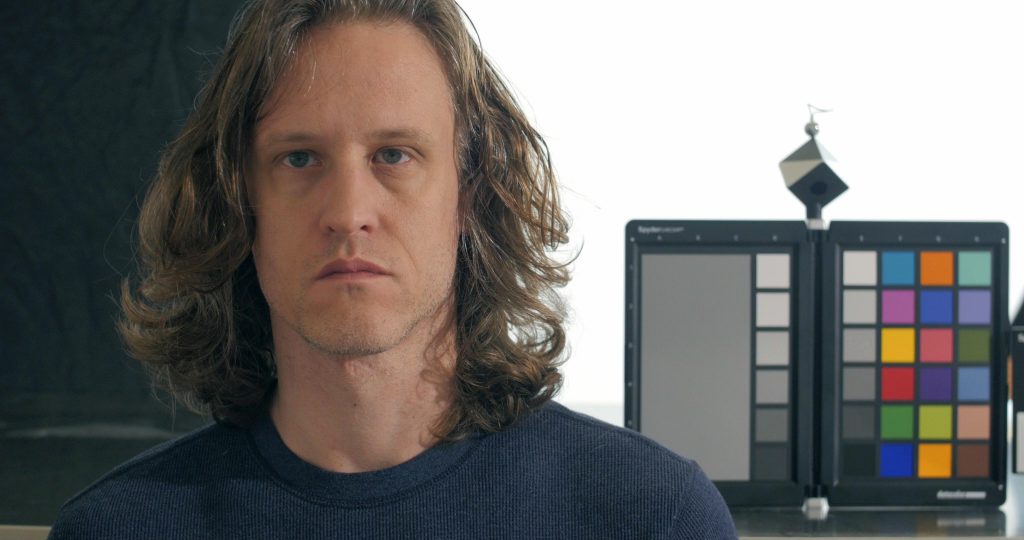
  • The last image is what we get when we normalize the Natural image.

It’s no wonder people think that the GH4 doesn’t look “filmic” if the majority of serious shooters are starting with the first image. It would take some serious color grading to get a usable image, let alone to make it look good.

While the general yuckiness of the skin tones* is what jumps out at you, it’s the chips on the ColorCheckr that really tell the tale: strong, narrow color errors in the Cine-D profile that get exaggerated when smashed and then expanded. (For example, note the yellow cast to the shadow side of the SpyderCube, even though 18% grey is balanced.)

The real kicker is that I fail to see any real increase in usable dynamic range. If you accidentally crush your shadows using the Natural profile, they are just as crushed using Cine-D. Accidentally blow out your highlights? Sorry, Cine-D isn’t going to help.

What’s the take-away? If you want to shoot with the Cine-D profile, don’t flatten all of the settings, too. If you want the most accurate color, the Standard or Natural profile should be your starting point.

*I apologize for the goofy looking model. I couldn’t cajole anyone to sit still while I shot over 70 different combinations of settings, so you’re stuck looking at me.
Color correction demonstration; why to NOT shoot flat or log on cheaper cameras

GCP correcting improperly “shot flat” or underexposed footage

One of the most overlooked parts of video production is color correction and grading, especially for small videography houses like Gazing Cat Productions. Good color in your videos make a huge difference in the audience’s perception of quality and production value. Unfortunately, a trend that has been accelerating over the past seven years or so is the inappropriate use of camera settings known as shooting “flat” or shooting “log” on consumer-level camera gear. While it arguably started with Technicolor CineStyle being made available for large studios to match Canon 5D Mark III footage against Technicolor color film processing and “smart” DSLR filmmakers loading it onto their Canon Rebel entry-level cameras, it has become almost ubiquitous today, whether through color profiles like Panasonic’s Cinelike-D and Cinelike-V or through cranking down picture profile settings like contrast and saturation.

The idea behind all this wacky flat/log color profile stuff is that you get an increased dynamic range because more of your bits per pixel are used to store shadows and highlights instead of midtones. The damage that these picture profile changes can do to your colors are quite serious and are not completely repairable.

In almost all instances, it is not appropriate to shoot flat or log unless you have a camera that will output 10-bit color, preferably with 4:2:2 chroma subsampling instead of 4:2:0. Unfortunately, the cheapest camera I am aware of (as of October 2018) that can output 10-bit 4:2:2 is the $1,700-$2,000 (for the body only, no lens included!) Panasonic GH5. Everything lower-end than a GH5, be it the venerable Panasonic G7, the Sony Alphas, or all the Canon DSLRs that have more than one digit before the “D”, outputs 8-bit 4:2:0 compressed video files. That means that none of these cameras can store more than 8 bits of color per pixel and that 3/4 of the color difference information for every 2×2 block of pixels is thrown away. The entire 2×2 pixel block is reduced to one color with brightness as the only difference between the pixels.

Needless to say, you can’t pull some kind of “one weird trick to boost dynamic range!” that’s going to magically make these files store more data. They’re already throwing away 3/4 of the color data to reduce file size and in-camera processing power requirements.

YOUR VIDEO COLORS NEED TO BE CORRECT IN-CAMERA AT THE SHOOT. DO NOT WAIT UNTIL POST-PRODUCTION TO “FIX IT.” YOU WON’T EVER TRULY “FIX IT.”

Gazing Cat Productions can probably help you restore the correct colors to some of your improperly shot footage. The process can be labor-intensive and expensive in severe cases like the video at the top of this post. Your best bet is always to get things right in-camera at the shoot. If you need help, feel free to call GCP and we’ll be happy to assist you.

If you’d like to read more about this subject, there is a Reddit comment thread with several videographers explaining why they stopped using CineStyle and a post from 2014 explaining why Panasonic’s Cine-D picture profile sucks.

Trying the Z Cam E1: image quality good, everything else bad.

I own a lot of cameras. The vast majority of them are old digital cameras that I bought for a web show idea that I came up with, but I obviously have several “new” cameras too. They run the gamut from the heights of awesomeness to the least configurable cheap old point-and-shoot bricks ever manufactured. One thing that I can safely say about even the most crappy-seeming camera I own is that it can take decent photos within its obvious limits. However, there is an annoying but growing trend towards offering nearly non-functional equipment for a vastly cheaper price and the Z Cam E1 has fallen into that sad niche. It fell from a price tag over $600 all the way down to $199 on sale. As soon as that happened, its place as the tantalizing cheap entry method into the 4K micro four-thirds video market was etched in stone.

I made a video review of the Z Cam E1 but the short version is this: almost none of the most useful features are functional. The auto-focus is basically useless and no focus distance guide or focus assistance is available in manual focus mode. It doesn’t work properly with some lenses despite being advertised to the contrary. Photo mode suffers from the same issues as video mode. While it’s easy to hand-wave these concerns when you’re emotionally invested in this camera due to the promise of a $199 MFT 4K camera, it won’t fix the serious flaws that make it difficult or impossible to use. The remote app freezes up easily which doesn’t help.

There is one situation where this camera is perfectly usable: you can set it up fully manually in one spot on a tripod and then leave it alone. I shot almost all of the review where the Z Cam E1 isn’t seen in the shot using the Z Cam E1 itself, in fact! I got some good shots, but I had to draw on my extensive experience in manual video camera operation to do it. For a beginner that is interested in video, this camera is a very seductive trap. For an experienced videographer, it’s a practical camera for static shots and can deliver great images within its limitations, but it’s hard to justify the purchase when a used Panasonic G7 body is almost the same price and offers a feature-rich fully functional MFT 4K camera, the polar opposite of the Z Cam E1.

I spent six months considering whether or not to get an E1 but the plethora of issues kept me from pulling the trigger. When someone I knew bought one and asked me for lens suggestions, I took the opportunity to put the camera through the wringer and examine it from the perspective of both a beginner and a video professional. In the end, I’m glad I didn’t buy one, but if I could get one for free I’d definitely use it. There are a couple of features like slow-motion and crazy high ISOs that I’d be happy to have in a little camera, but those features don’t do anything to fix the Z Cam E1’s severe problems.

Watch this review and don’t say I didn’t warn you.